
How To Automate Email Marketing In Mailchimp
Your company’s email marketing is more effective when you combine it with the power of automation. Up to 8x more effective.
In a study on email open rates, when marketers switched from bulk emails to triggered emails, they saw a staggering increase in open rates.
If you have ever sent an email campaign to your customers, you know that open rates are essential for driving sales and your bottom line. The sales and revenue you generate from your email campaigns are directly tied to your open rates. High open rates means higher ROI generating email campaigns.
Email marketing automation works because it helps you send email campaigns to your customers, at all the right moments.
Triggered emails are email campaigns that are deployed when your email contacts meet certain criteria that you define. Triggered emails are so effective because they personalize your campaigns to your contact’s stage in the customer journey and their specific interests. They add a unique, and personal touch to all your email campaigns. When someone subscribes to your email list, you could trigger a welcome email to send a warm welcome. When someone purchases a product, you could trigger a special offer email to encourage them to purchase again. When someone books an appointment, you could trigger a nurture campaign to win their trust.
Email marketing automation helps you send better, more effective email campaigns. With triggered email campaigns, you can send campaigns that yield higher open rates, and generate more email ROI – up to 320% more in revenue than bulk emails.
We show how to create a triggered email campaign, from tag creation, to tag management to setting up your first Customer Journey.
Step 1: Create Tags
The first step in automating your email marketing is creating tags. Tags are triggers. Tags help you segment your contacts so you can send personalized emails when someone completes an action. That action could be when someone subscribes to your email list. Now you need to name your tag. You might name your tag Email Subscriber. You can add tags manually to contacts or they can be added automatically to contacts using: embedded forms and integrations on your website.
Automatically tag your contacts with embedded forms
Using embedded forms:
-When someone signs up to your email list using an embedded form, you can automatically tag that contact. It eliminates the need to manually add tags to your contacts which can save you a lot of time. To create an embedded form, you need to first have a website builder that allows you to embed HTML onto a page on your website. The good news is that most website builders allow you to embed HTML. Before you can even embed the code, you need to first create the form in Mailchimp with their Embedded Form Builder.
To create an Embedded Form:
-Login to Mailchimp or create an account
-Toggle under Audience and click Signup forms
-Click Embedded Forms
-Click Tags, create a tag or select your already created tags
-Once you are happy with your form, choose Continue
-Click copy code and paste the code onto your desired page on your site that you want to collect emails on
Automatically tag your contacts using Mailchimp integrations
Embedded forms are good for collecting email signups but most people sign up to your newsletter when they make a purchase or become a lead. You can automatically assign a tag to your contacts when they become a paying customer or a lead, with integrations. Mailchimp is a popular small business email marketing platform. Most plugins and website builders come with integrations that allow you to automatically assign tags to those contacts. You can do this inside of the Settings of your form plugin or your website builder.
Now that you’ve embedded your form onto your site and added tags and connected your Mailchimp audience to your website/website plugin, the set-up for your automated email campaigns is almost complete! Now you are ready to start creating automated trigger campaigns or Customer Journeys, with starting points, rules and actions.
Step 2: Create Customer Journeys
It’s time to build your customer journeys! It is here that you will configure and set up email marketing automation campaigns using the tag you just created in the first step. You will use that tag as a starting point. When it comes to creating customer journeys, you have a few different options. If you are new to triggered emails, you can create a pre-built journey. If you want more customization, you can create a custom journey. If you have an online store that integrates with Mailchimp (Shopify), you can create a journey for connected stores.
Pre-built Journeys
Pre-built journeys are journeys that are already made for you in the Mailchimp platform. You can customize these pre-set journeys with your own “starting points” (when someone signs up to your audience or a tag is added), “rules” (tags, groups, time delays) and “actions” (sending an email). These pre-built journeys are categorized by objective from sales to engagement, so you choose a journey that most closely matches what you are trying to accomplish with your triggered campaign.
How to Set Up a Pre-built Journey:
-Go to your Mailchimp dashboard
-Under Automations on the left hand side, click Pre-built journeys
-Choose the journey that matches your email marketing goal, e.g., drive audience actions
-Click Build A Journey in top right, Click Continue
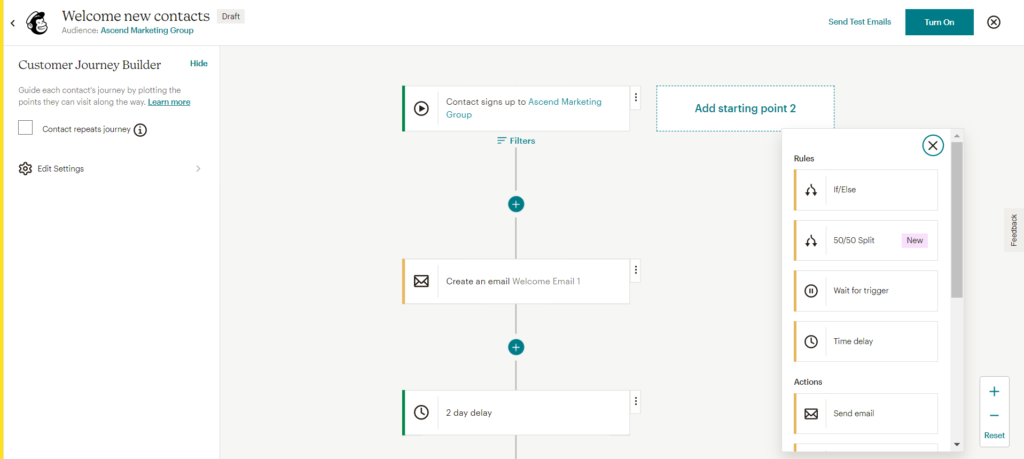
-Start customizing your journey. You can customize by starting points, rules, and actions. Starting points are where your contact first enters the journey. Feel free to use one of the tags you just created, as a starting point. Rules give you more control over when someone will receive your email and rules include conditions and time delays. Finally, you’ll choose send email as your action and you’ll write a subject for your email and set a schedule for the email. Create your email using a premade template and customize it to your liking
-Always test your emails to ensure they are mobile friendly and visually appealing. You can do this by clicking ‘Send Test Emails’ in Customer Journey Builder
-Your triggered email campaign is complete! Click ‘Turn On’ to start sending triggered campaigns.
Custom Journeys
Unlike pre-built journeys, custom journeys are made completely from scratch. Start building your triggered campaign in your Customer Journey Builder.
Journeys for Connected Stores
Mailchimp easily integrates with popular third-party ecommerce platforms including Shopify and WooCommerce. All you have to do is connect your store inside of your Mailchimp account. Once connected, you can automatically: send offers to abandoned customers, recover abandoned carts, recover lost customers, encourage customers to repeat purchase, request online reviews from customers who just bought from you, encourage customers to fill out surveys who just purchased. Much like pre-built journeys and custom journeys, journeys for connected stores are fully customizable and you can customize starting points, rules and actions. The important thing to remember is that you must be using Shopify and only customers who are logged into their account on your store, can receive shopping reminders and abandoned cart emails. Guests on your site, for example, will be excluded from receiving shopping reminders and abandoned cart emails.
Comments are closed